![]()
Contents: Ford F-series, aluminum-bodied, pickup trucks; Basics; Ground Straps; How to Attach Them; Where to Put Them;
Ford F-series, aluminum-bodied, pickup trucks
Ford's F-series, aluminum-bodied pickup trucks require special installation practices (bonding) with respect to galvanic corrosion. Here is the bulletin from Ford which explains what must be done to prevent galvanic corrosion. The results of failing to follow Ford's guide lines are predictable, and not covered under warranty! If in doubt, contact your local Ford dealer for details! Fortunately, no body bonding is required, as Ford has done that job for you.
The same basic rules apply when installing amateur radio gear in any other aluminum bodied vehicle. However, their factory recommended installation procedures may be different than Ford's. It is always best to contact your local dealer and/or the manufacturer's customer support staff.
A vehicle is not a ground plane, but rather acts like a capacitor between the antenna and the surface under the vehicle which acts as the ground plane. Since the surface in question is a poor conductor of RF, ground losses occur. If we wish to maximize the system efficiency (the mobile station as a whole), we need to maximize the RF continuity of the vehicle, hence proper bonding. Obviously, proper antenna mounting, and placement are important too. Remember, it is the metal mass directly under the antenna, not what's along side, that counts. And a ground strap is not a replacement for proper mounting!
Bonding also minimizes the leakage of RFI into (ingress) and out of (egress) the various bolted on parts of the vehicle. The exhaust and tail pipes are good examples of RFI egress. Bonding horizontal surfaces (trunk lid, hood, etc.) will have a greater effect than bonding vertical ones like doors, and hatches. It is not uncommon to see a 20 to 30 dB drop in received noise levels once they're properly grounded. Bonding is especially important for body-on-frame vehicles, like pickup trucks. In these cases, the bed and cabin should be bonded to the main frame as well as between the bed and the cabin to prevent ground loops.
Remember that RF must return to its source. Low mounting forces a larger portion of this return current to flow through the lossy surface under the vehicle, rather than through the (less lossy) vehicle's superstructure. Therefore, it is easy to see why proper mounting, and proper bonding are requirements to maximize radiation efficiency.
There are a few pundits who are under the misguided belief, that running a braided bonding strap along the frame of a body-on-frame vehicle, bonded every few inches, will drastically improve the less than perfect ground plane a vehicle represents. It won't!
There is one important item to keep in mind about bonding specifically, and noise abatement in general; you can't always tell there has been an improvement by just listening! The reason centers around the AGC circuitry. That issue is covered in the high-lighted article.
The first rule to follow about ground straps, is to keep them short! The rule of thumb is, 10 inches or less! And, there is a reason for why. A ground strap, like any piece of wire, has both inductive and capacitive reactances, which change with frequency. As the frequency increases, inductive reactance (in ohms) increases, but capacitive reactance (in ohms) decreases. When inductive reactance and capacitive reactance in any given piece of wire are equal, that wire will cease to be an RF ground.
Flat braided wire should be used for bonding, because RF flows on the surface rather than through the wire. Flat braid has more surface area for any given current carrying capacity, thus it provides less resistance to RF than an equivalent round wire. It also has more capacitive reactance which increases the self resonant point. Flat braid is also much more flexible and less likely to fail due to repeated flexing.
The shield from RG8 works well if the length of the strap is short (under 6 inches or so). Just take care when you strip off the outer jacket that you don't cut through the shield itself. Discard any that is corroded or discolored. Flatten it out by pulling it over a rounded surface. A large, round screwdriver shaft works well for this purpose.
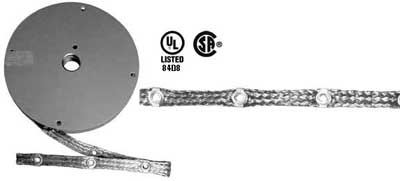 If you're not into making your own, both ABR Industries and Electric Motion manufacture copper braid material with grommets preinstalled. That's EM's 2080 product in the photo. Simply a sheet metal screw and star washer is all you need to make a good bond. Ham Radio Outlet stocks the ABR material.
Good connections are also important to provide both a DC and RF ground path. Crimping and soldering (in that order) are mandatory. Crimping provides a good mechanical connection, and soldering a good electrical one. Good quality lugs and connectors are a must too, as the cheap ones do not solder well. Where applicable, connections should have heat shrink applied over them. Although not strictly necessary, it gives a finished and professional look to your installation.
Rule one for making connections to the bodies and frames of vehicles is simply, do not sand the finish to bare metal! The reason is, bodies and frames of modern vehicles are dipped in a zinc compound. This zinc compound oxidizes in the presence of air (oxygen) and seals scratches in its surface.
Rule two is, be very cognizant of existing wiring! Modern vehicles have dozens of wire looms placed throughout the superstructure. This includes the A, B, and C pillars, under both door sills, inside the doors, under the carpet, and behind almost every piece of trim. If in doubt, find out what's behind the panel before you drill or screw. This is why it is wise to purchase a repair manual for your vehicle.
When bonding the tail pipe for example, there are usually strengthening members, or existing mounting bolts which can be utilized. The bottom edge seam of the rocker panels is also a safe bet. Some vehicles have predrilled and tapped holes for accessories and/or for assembly purposes. They're usually metric which will necessitate a trip to the hardware store. What's more, they're safer than drilling into panels unless you know for certain, nothing is behind them.
 While you're at the hardware store, pick up a supply of star (serrated) lock washers, as standard lock washers aren't worth the effort. The preferred type have both internal and external teeth, but are not always available in the smaller sizes. . When properly installed, they bite through the various finish layers, and into the base metal below. Once exposed, the zinc compound seals the connection. The use on NoOx® and similar compounds really isn't necessary, but they do retard rust and oxidation of the mounting hardware. In any case, do not use these compounds under star washers, and between the mount and the vehicle's structure. In other words, let the zinc oxide do its job of preventing rust.
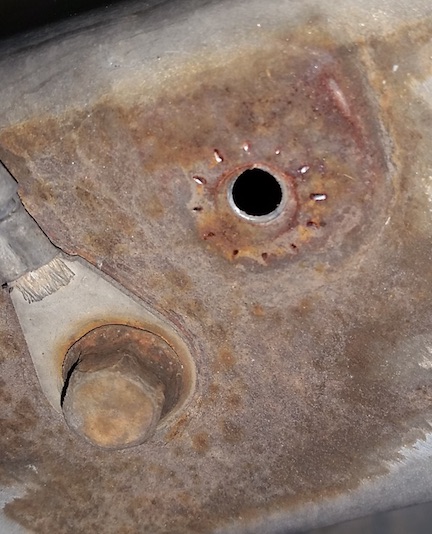 Speaking of rust. No matter what you do, sooner or later any fastening device, washer, bolt, screw, etc., will rust. The photo on the right is a typical example of the long-term (five years in a dry climate!) issues they have. It pays to do regular maintenance of all electrical connections, bonding or otherwise.
If you can find them, use lugs with built in star washers. Some versions have an embossed serration rather than an actual star washer design, and are easier to find. I purchased mine from Fastenal, but there are other sources such as Mouser Electronic Ace hardware stores, and onlinecomponents. Uninsulated ones are usually cheaper, but harder to find than the insulated ones.
I typically use two sizes of lugs; ones with a 1/4 inch bolt hole, and ones with a #10 screw hole. Wire size depends on the braid size. Lugs for #12 are adequate for RG8 shield, and lugs for #4 work best for 1 inch braid material. I use the lugs with a 1/4 hole when I'm attaching to an existing bolt, and the #10 ones for everything else.
The actual screw type is up to you. I use several different types. Number 10 self-tapping sheet metal screws work well if the material is 12 gauge or less. Self-drilling ones work better for thicker material. Phillips head and hex head both work well. In any case, I wouldn't buy any longer that 1/2 inch, and 3/8 is a better choice. Longer isn't going to hold better, and just might run into something you cannot see. I usually make up several 6” long straps for the doors, 10” long ones for both sides of the engine, both hinges of the hood and trunk, and at least three for the exhaust and tail pipes. Remember to crimp and solder them as crimping alone allows moisture to seep into the connection with predictable results. If the strap is subject to abrasion, cover it with heat shrink tubing.
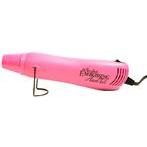 Heat shrink tubing requires a heat gun. Besides the tubing, all of the aforementioned companies carry heat guns with prices varying between $40 and $250 depending on both quality and duty cycle. Since we don't use one all day long, we don't need a high priced one, so here's a suggestion. Hobby Lobby sells (in store and on line) a heat embossing gun for ≈$30. It works perfectly as a light duty heat shrink gun, and its small size and light weight making it easy to store.
As noted above, horizontal surfaces are more important than vertical ones. So if you're not into spending hours bonding everything in sight, pay attention to the hood, trunk lid (if any), and the exhaust system. If you've resorted to using (less than desirable) hatch mounts like the K400, make sure the hatch is very well bonded. If you end up with common mode problems, lack of bonding in these areas is the first place to look!

 Almost without exception nowadays, exhaust systems are made of a good grade of stainless steel. Wire brushing a small area for the lug to bite into and using stainless steel hose clamps to secure the lug has always worked for me. I have never had one come loose or need retightening. The opposite end should be attached to the underframe or unibody strut work. If the car is undercoated you may have to clean a small area. A Dremel tool with a wire wheel works well for this operation. Just don't brush past the zinc layer to bare metal!
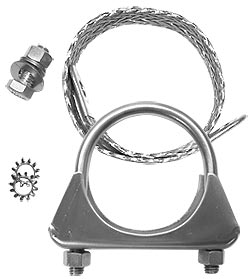
The exhaust system should be bonded before and after the catalytic converter, and at least once after the muffler. If tail pipe is extra long, a fourth strap might be worth the effort. By the way, DX Engineering sells exhaust system grounding kits, shown left, for those who don't wish to go to the trouble to home brew them.
If your vehicle is body on frame you'll need a bunch of straps to go between the body and frame. As an example, four separate straps (one on each corner) work well for a pickup bed. And, a bond between the bed and the cabin is also advisable. Incidentally, don't rely on any factory strap to provide a good RF ground. They're meant solely for DC grounding tail lights etc., and are inadequate for RF grounding needs. The same can be said for factory engine strapping.
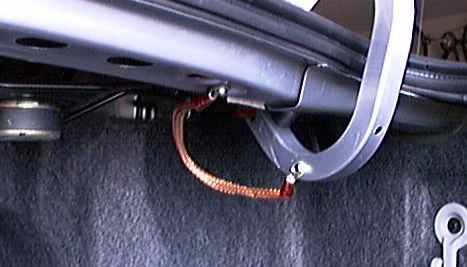 Depending on the vehicle, there can be several dozen other places where ground straps will provide a benefit. These include, but are not limited to, bumpers, bumper backing plates, suspension parts, rear axles, tailgates, or virtually any bolted-on piece of hardware.
There is an old cliché that says an ounce of prevention is worth a pound of cure. If you'll just take the time to do your bonding correctly, you'll be amply rewarded. Short cut it, and the results won't be worth the effort. I spent some eight hours making, and installing the straps on my Ridgeline. If it takes you much less, you probably didn't do it right. By the way, there are hi-res versions of these photos in the Photo Gallery.
 Caution should be exercised when bonding doors, hoods and trunks. You don't want to end up drilling through the lid, or into a wiring harness underneath! (Another good reason to buy a service manual.) Keep straps away from away from hinges, door stops, and weather seals. Hoods and trunks should be strapped across both hinges. If you mount an HF antenna on a trunk lid, you will indeed have excessive common mode current, no matter how well you bond the lid and/or mount. Making matters worse, common mode chokes must be placed outside the vehicle to minimize RFI ingress. This goes for control leads chokes too. This is another good reason to avoid trunk mounting on any band below 2 meters.